If you went and looked at your BBQ right now, would it make you happy? Or is it just a black/grey blob of furniture that sticks out in your backyard. Well, I am here to tell you that you don't need to settle for a bland and boring BBQ. I've partnered with Rust-oleum Canada to show you that you can turn your BBQ into a total work of art with just spray paint! And nope, this isn't going to be another boring how-to of cleaning your BBQ to make it look new. We are seriously going to reinvent what you think a BBQ can look like!
Materials
Painters Tape
Drop cloth/ Cardboard
Stencil
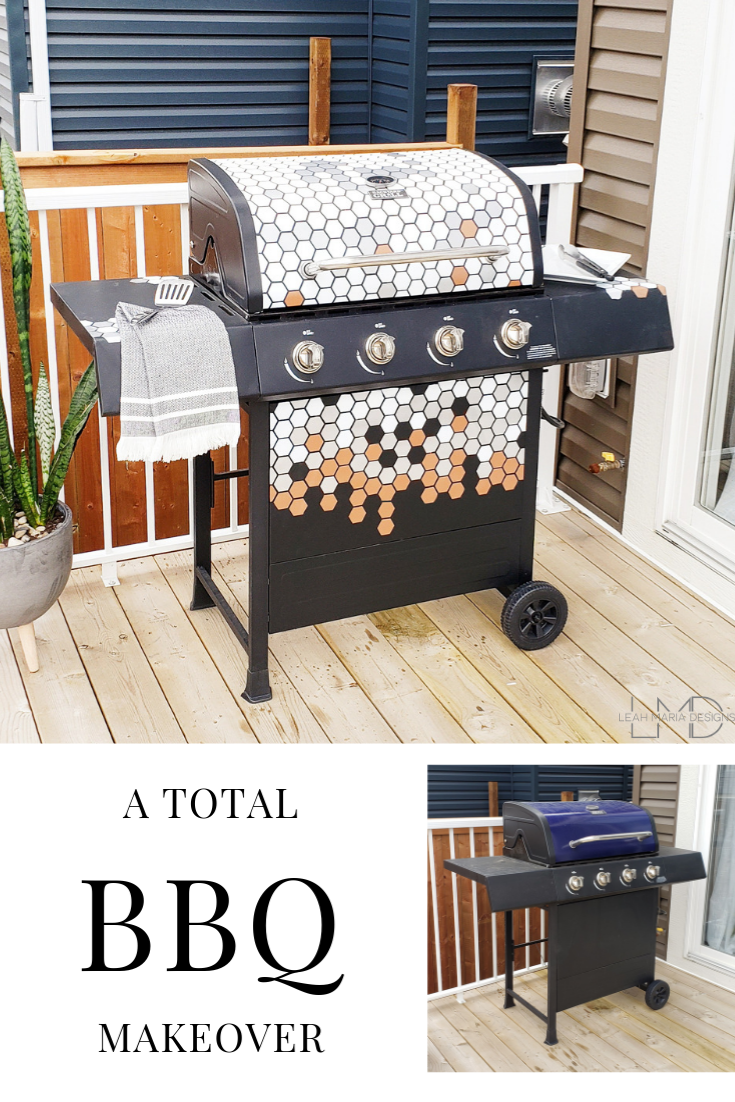
So here is a little before and after so you know what we are going to be do doing today.


Amazing right?! Definitely not bland and boring now! So there are SO many designs you could do, but today I am just going to walk you through how I did mine. It will be pretty much the same process no matter what stencil you use, or you could just as easily make a fun pattern with painters tape as well!
So first things first, you are going to have to clean it. I know I know, I literally just said this wasn't one of those posts but lets be real, it probably is a tad on the greasy side. Remove any hardware that you can, and anything you can't remove and you don't want spray you can cover with tape. So once its all cleaned up, if there are any glossy surfaces, you'll need to lightly sand them to scuff it up a bit. This is going to help the spray paint stick to the surface. After you sand give it another quick wipe with soapy water and your good to go!
Once its clean and sanded spray the entire thing the same base colour. I went with black.

Then its time to lay down the stencil. You can make your own if you have a Cricut or Silhouette (this is what I did) or there are lots of stencils available at craft stores and online. You could also just make a fun pattern using painters tape. If you have a rounded BBQ putting the stencil can be tricky but tape is your friend and so is stencil adhesive if you need it.

Once the stencil is down go ahead and start spraying! If you are going to use multiple colours like I did, just be sure to tape off the areas you don't want sprayed as you go.I did white first, then taped off the areas I wanted to stay white. Then sprayed silver, taped of the silver areas, then sprayed the aged copper.


Once it's all sprayed you can removed the stencil, put the hardware back on, and enjoy your BBQ! One of the great things about Rust-oleum's High Heat products is you don't need a primer OR a finish. Its also rust preventative so its going to help keep your BBQ looking amazing for many summers ( and winters :( ) to come! I have had mine outside uncovered for about a month now, and its still looking like I just sprayed it!

You can head over to Rustoleum Canada's website for another look at the tutorial and a direct link to the products I used as well! Click here
This looks AMAZING! What a fun project. Our BBQ is on it's last legs, but I hope to get another used one soon and this would be a great facelift. Thanks for the awesome idea:)
ReplyDeleteThank you for the kind words! Happy I could provide some inspiration. There are so many possibilities!
DeleteThis comment has been removed by the author.
Delete